Your email system was upgraded to Microsoft 365 (Outlook), so you will see Microsoft 365 on the login page. You may want to review this page for help getting acquainted. Look at the 4 red Quickstart Sections below! Sections have horizontal lines before and after, and Quickstart sections say End of Quickstart Section at the end of the section. Of course, sign out from the very top-right icon when done with email!
There is information further below that will be needed for Android or iPhone, but is super simple. With phones, any contact or calendar changes will not update on your webmail if you do not have Exchange setup on phone. If you don’t add any contacts or use the calendar from phone, you don’t need Exchange.
Subfolders and subfolder messages are transferred. Contacts are transferred. Sent folder messages are transferred. If you do not think that happened, read further below in the subfolder section. However, email signatures, email templates, inbox rules, and block/allow lists won’t be moved to the new system, so will need to be setup if you use any of those things. This page will be updated/improved as we go, so check back for tips, but you can also find help using the Help section (Question mark on top-right) within your email.
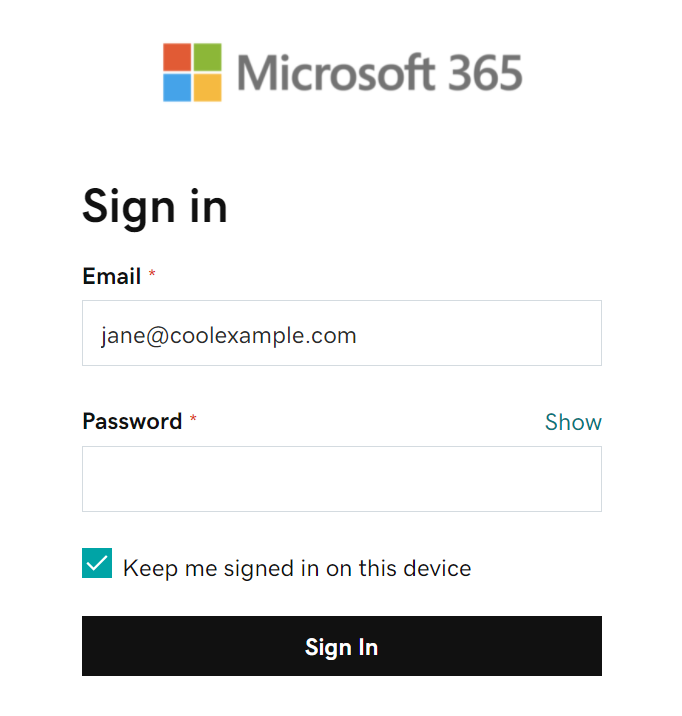
Email Upgrade: Your southeastacademy.net email has been upgraded. Your login will remain the same! However, the webmail login page address will change to email.southeastacademy.net instead of the secureserver address. The new webmail login page is updated on the Southeastacademyonline.com website under Helpful Links/Staff Login.
Why the Upgrade? Most importantly, we did not have a choice, but there are multiple good things about it! However, there are some additional bells and whistles we will not use or we will not use right away. For example, do not use the “Install Office” button! We only received info for the required upgrade to Microsoft’s system a few weeks back. This upgrade was not an option, but required. The existing Workspace email will now be using the Microsoft 365 system, which is an Outlook or Microsoft Office system. Even though it could be called Outlook or Office 365 email, it is best to consider it “Microsoft 365 email” when searching for info on the internet. Microsoft 365 will provide many improvements, such as a better “search messages” features, plus allow unlimited emails to be sent daily instead of having a 250 per day limit. Note: your local internet provider may still require separate quantity/group rules that are lower. You may notice some similarity to gmail. However, you will need some initial orientation to help you get going.
Subfolders: If your subfolders and subfolder structure are not showing, there are Instructions for subfolder retrieval. If you do not see your subfolders you created, all your past emails will be in the inbox. I have read all the documents and even called to try to find out answers, but got the feeling the subfolder issue is a slight possibility. The emails are in the new system though! If you use subfolders, it is usually good when searching to Search All Folders (which is set to be the default). One reason is so it will include the Sent folder. That way in the search results, it will pull up all the student or parent emails, plus your messages sent to them (in order of date).
With improved SEARCH, do I even need subfolders? Many people familiar with Gmail just leave all messages in the Inbox and do not use subfolders, then just use Search at the top to search for a person’s full or partial email address, full or partial name, or unique topic, which will pull up all emails with most recent at top. Unlike the old system, Search will quickly find any emails for just a single word used in the message. Normally you want to try to use a word or words that might be unique that is in the email you are looking for. For example, you remember communicating with someone about “Skype”. so just search for “Skype” and all messages with Skype in the message will appear. Then you might recognize the email you are hunting for. For teachers, searching for a student last name might be good, but many parents have different last names so it might take a second search using the parent last name if you do not find what you are looking for.
There are some differences in appearance from Workspace, so I will cover some basics. IMPORTANT NOTE: At this time, do not “Install Office”. There are additional costs! Just use the Outlook mail icon section in your account!
The new webmail login page is available on the Southeastacademyonline.com website under Helpful Links/Staff Login. The new page address is much easier to remember if just typing in to your favorite browser: email.southeastacademy.net Notice it says “Microsoft 365” on the login page.

After you have logged in to your email account the first time, you can also go to office.com on a browser to sign in to webmail.
 End of Quickstart Section
You will be asked if you want to stay logged in. Initially, I said it might be a good idea to say “No” for security strength. However, after seeing the time it takes to re-login, you may want to choose “Yes”. You can always manually logout when you will be away from the computer for a long period or at the end of the day if you leave your computer on all night. Just click the very top-right circle icon and sign off.

You may have noticed or will eventually notice a popup about “Switch your ribbon”. By default, your ribbon is set to Simplified, You may want to look at the Classic version that has icons and text. At least, notice where you change versions (down arrow on far fight side of menu bar).

You will be asked at some point if you want to make Outlook on the Web your default email: “Try it now, Ask again later, or Don’t show again“. If you do make it the default, anytime you click an email link anywhere in the browser, it will use your southeastacademy.net email to send the message. If you use your device for anything besides school, this is a bad idea! That is because your school email can easily be added to mailing lists if you send from your school email account! Unless definitely a school communication, it is usually best to use your junk email account for most clickable email links.

Click the Outlook icon on left to enter email! (Note: Before clicking the blue Outlook icon, you will be on the Microsoft Office Home page. It shows you some recent activity, but you should click the Outlook icon to go to the email program! You can close the Microsoft Office Home after the Mail icon page opens if you want.)

If you use a signature with your emails, please see this signature help!
End of Quickstart Section
To Write a New Message, click the “New Mail” button. Instead of a separate window, a compose section will open on the same page/tab.

Click “Send” after writing.

End of Quickstart Section
Reply: To reply to a message, with the message open, click or tap either of the two Reply methods.
Contacts: You can also click their Profile circle (green ‘E” in this example) to add to Contacts. Click the circle, choose Contact at top, enter name, click Create.

End of Quickstart Section
When using a person or list from your Contacts, you need to click or tap the plus sign + next to their name!
You can get to Contacts from the To: or CC: buttons while composing a new message to choose a contact. You can manage your Contacts by clicking the People icon on the left side of most screens. You can add a new person to your contacts by clicking their Profile Circle in an email you receive from that person (choose Contact, enter Name, Create).
Manually Adding Someone to Contacts: Click the 2 people icon on the left from most screens to go to the Contacts page. Click Add A Contact then add your contact’s name then using the “+ Add More” option to include the email. I would not recommend using Inbox Rules or another method to make a contact “prioritized” more than other emails (like the “starred” system in Workspace). It can be very easy to miss messages if you don’t really understand how it works.

Option 1: A simple method is to use a “Your Contact List”
This is different than setting up a more involved Group method. If you use this “Your Contact List” method, when sending an email to your list, you should put your own email address in the To: but place Your Contact List in the BCC: This is so recipients cannot see the other recipients! This is especially important with parents and students! If sending to coworkers, then you can put the Your Contact List in the To:
First, you have to create Your Contact List of people and give the list a unique name.
Note: I would recommend starting your List Name with a symbol such as a Tilde ( ~ ). That is so when you compose a new message to send to a list, Your Contact List will be at the very top of your contacts. It will also differentiate your list from a regular contact. e.g. ~Students2223 Clicking the BCC: button to the far right of To: will put the BCC option under the To: and CC; buttons. Click the relocated BCC: (when it is under the CC: button) to pull up your contacts to choose your list.


Option 2: Using a Contact Group (will add instructions later)
Option 3: Using a Distribution List (will add instructions later)
Options 2 & 3 have some beneficial features, but it needs testing a little more before I will post instructions. There are some drawbacks I need to evaluate.
Limits To How Many Emails Can Be Sent:
Although Microsoft 365 allows unlimited emails (relays) to be sent, your local internet provider (ISP) may have separate limitations of either daily volume, hourly volume, etc. For example, some ISP’s may limit the group to be smaller than 25. The problem with internet service provider limits is that your email will look like it sent to everyone in the list, but some may not receive it, so it is probably a good idea to stay less than 25 until you learn your internet provider limits. I am still researching if setting up Exchange for your account (even if you aren’t using a phone) will bypass ISP limits. I’ll update on this page when I find out.
End of section
Reminder: If you were using subfolders and do not see your subfolder structure, use these instructions.
To use Subfolders to keep organized: You need to have a subfolder already created. If you need to add a new one, click “Create New Folder” and give it a unique name. (bottom left of pic below), then checkmark message(s) in the Inbox or search results, then use the “Move to” button to put them in the subfolder. Searches will also look in subfolder messages if you leave the search default as “All Folders”. There is a down arrow on the left side of the search box where you can just search Inbox, Sent Items, or a specific subfolder.

Phone Users:
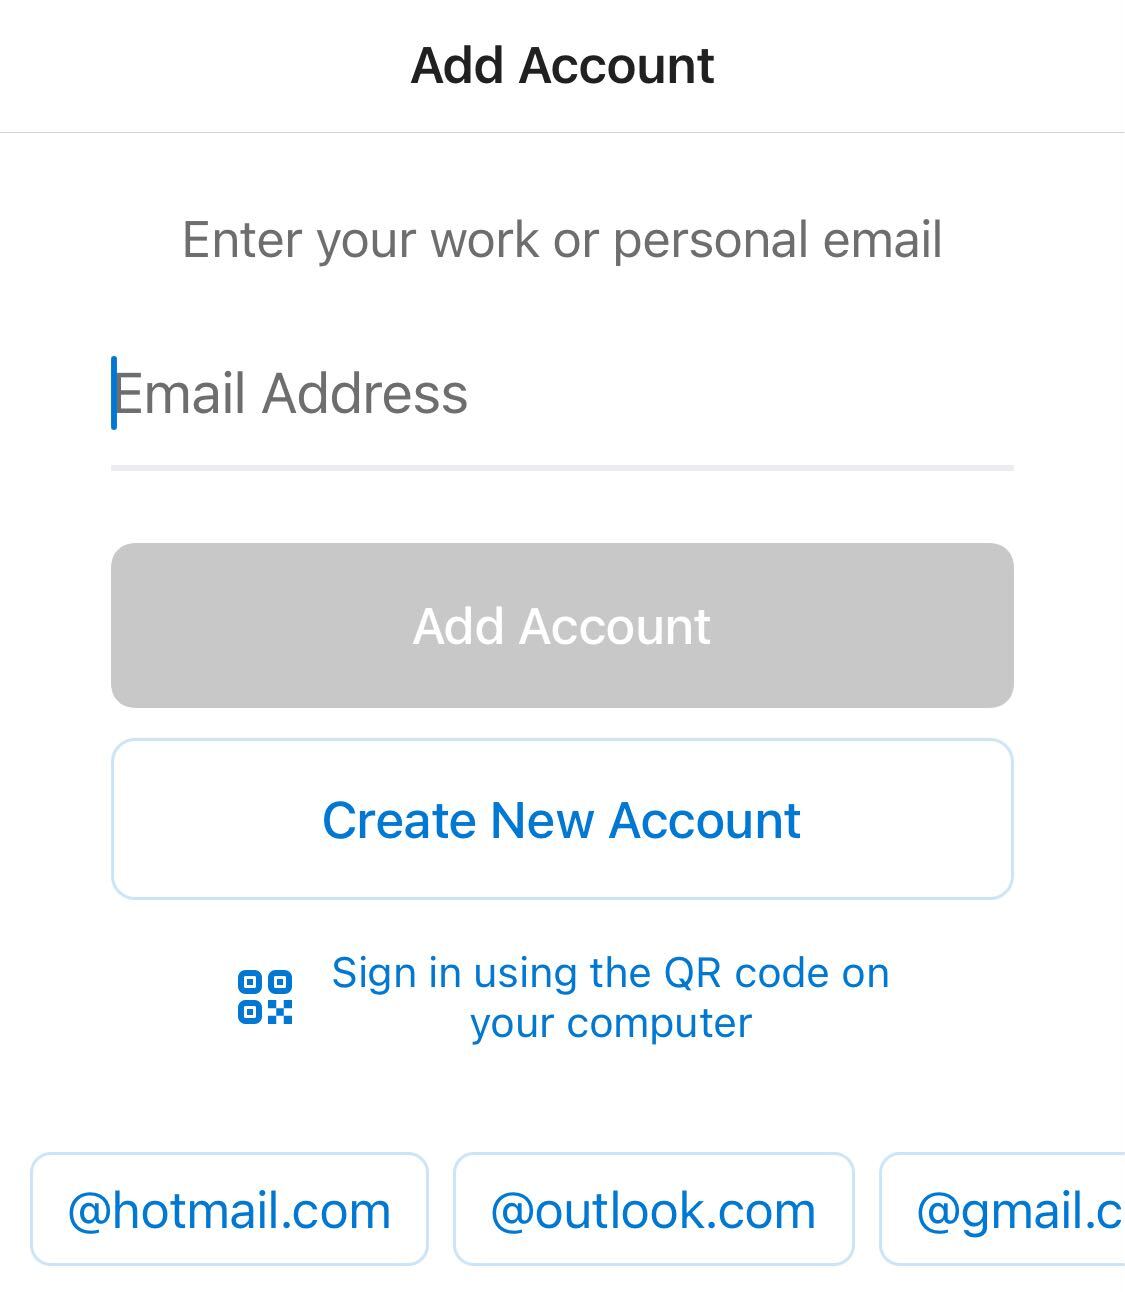
Instructions for setting up Microsoft 365 using the Outlook app. I do not recommend adding your school account to your gmail or Mail account for student privacy. Outlook app is recommended. If you have trouble afterward, there is an “Exchange And Mobile Troubleshooting” section further below.
I did not need to use the instructions below. I just downloaded Outlook from the Play Store, opened it, tapped Add Account, entered my email and pw, done! I went ahead and did the Exchange setup using the “Exchange And Mobile Troubleshooting” section further below even though I won’t probably add contacts from my phone or edit a calendar.
1. Download Outlook at the Google Play Store. (Not the lite version.)
2. Open Outlook.

End of section
If you have trouble afterward, there is a Troubleshooting for Mobile section further below. I read IOS v 14 or above is needed. We recommend using the Outlook app for iOS.
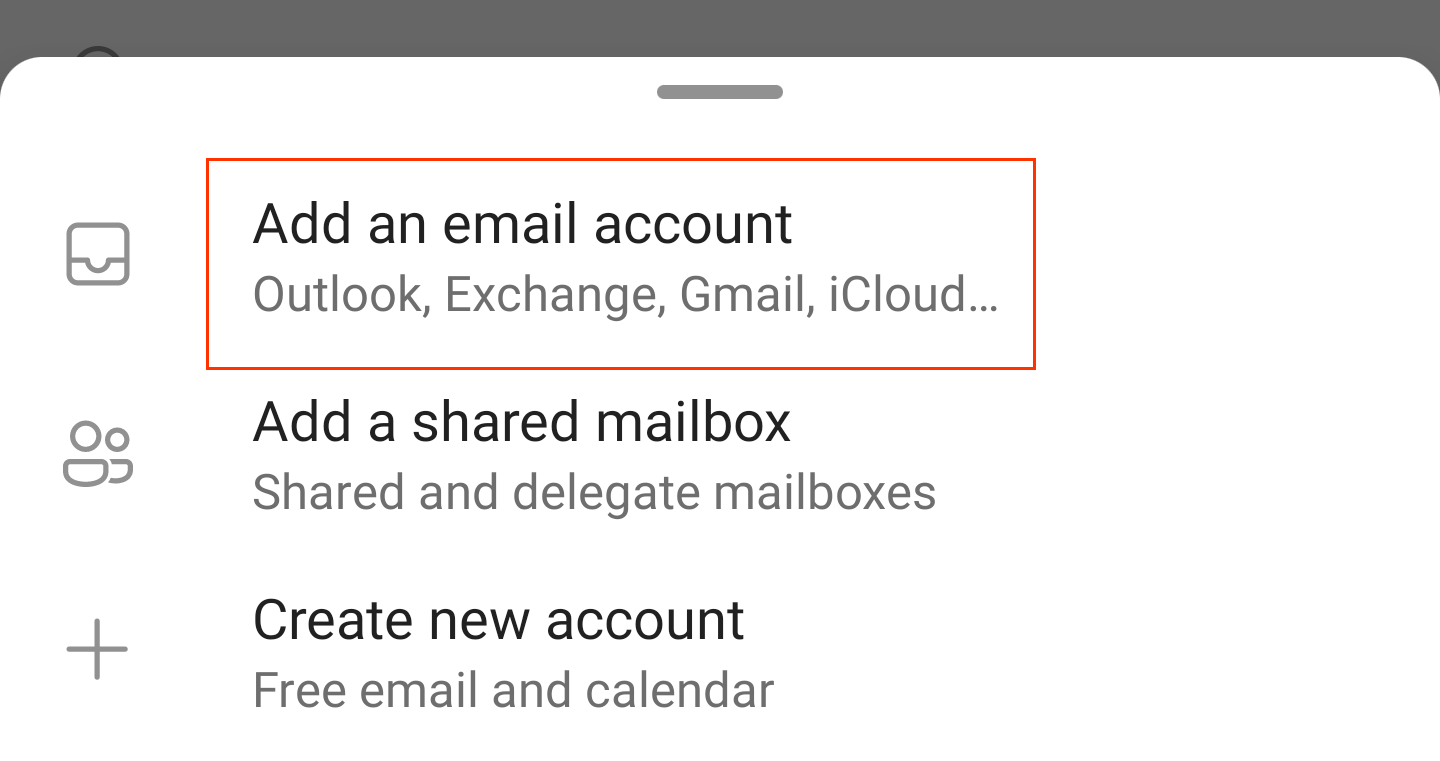
Add your Professional Email account to Outlook for iOS. Then you can send and receive business emails from your iPhone or iPad.

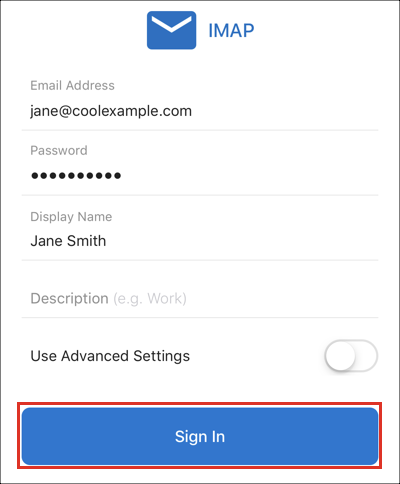
If Outlook can’t auto-discover your email account, toggle Advanced settings to review and edit your port and server settings. Then, tap Sign In.
A) IMAP Incoming Mail Server: imap.secureserver.net:993
B) IMAP Password: Workspace email password
C) SMTP Outgoing Mail Server: smtpout.secureserver.net:465 (try port 587 as an alternative)
D) SMTP Password: Workspace email password

End of section
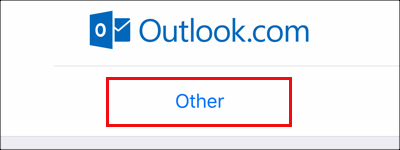
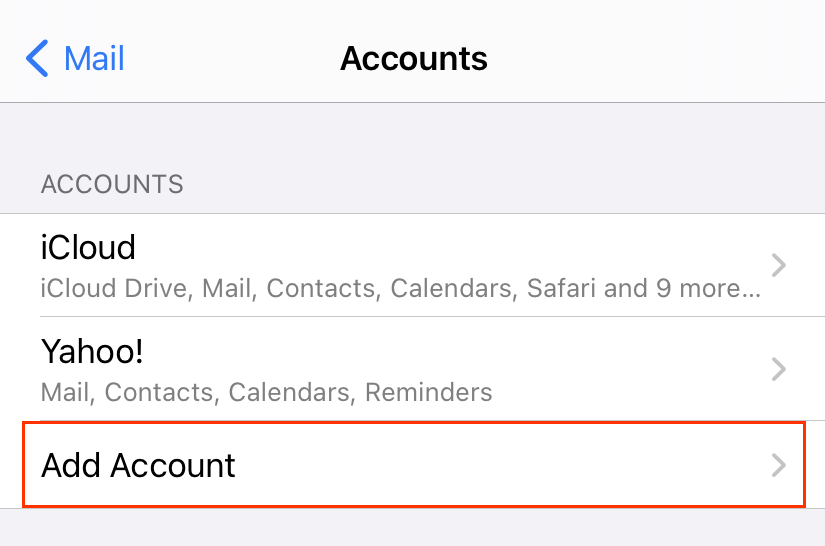
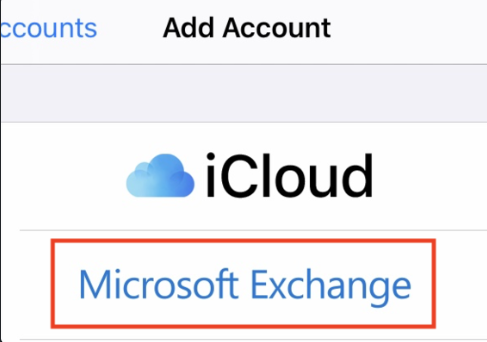
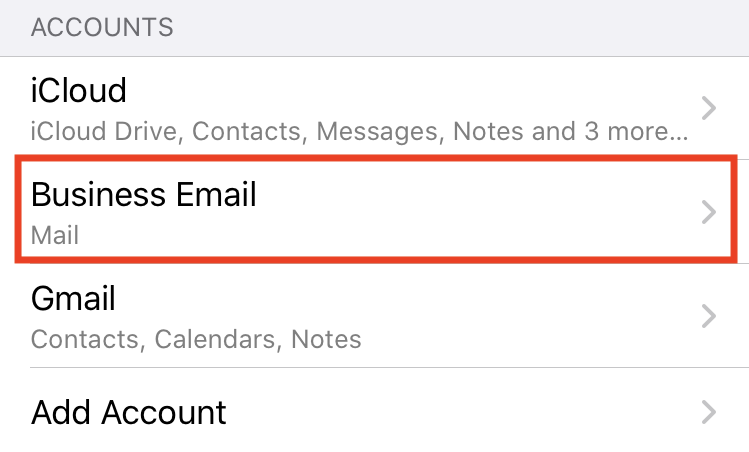
If you have trouble afterward, there is a Troubleshooting for Mobile section further below. I read IOS v 14 or above is needed. Although I don’t recommend it for student privacy, you can add your Microsoft 365 account to the IOS Mail app. Here are IOS Mail Instructions: Our company’s instructions shown below. Alternate instructions from Microsoft here: Microsoft Webpage for setting up an Outlook account on the iOS Mail app
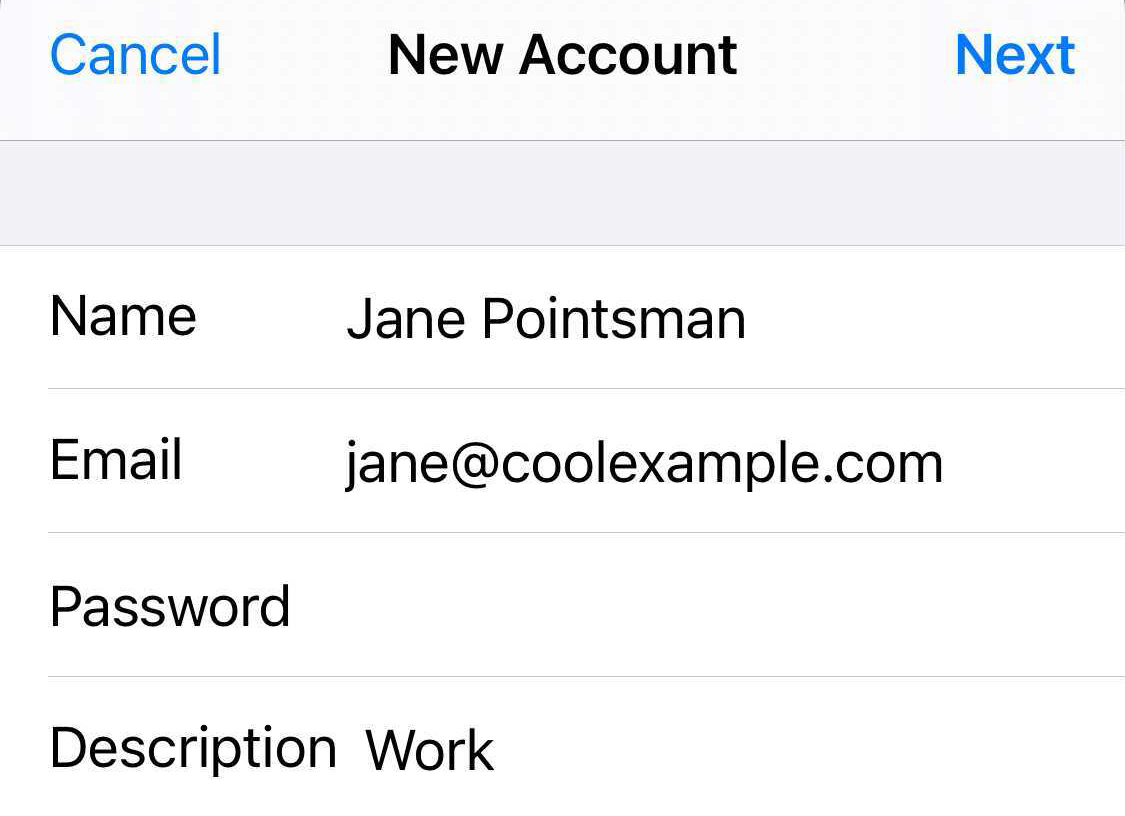
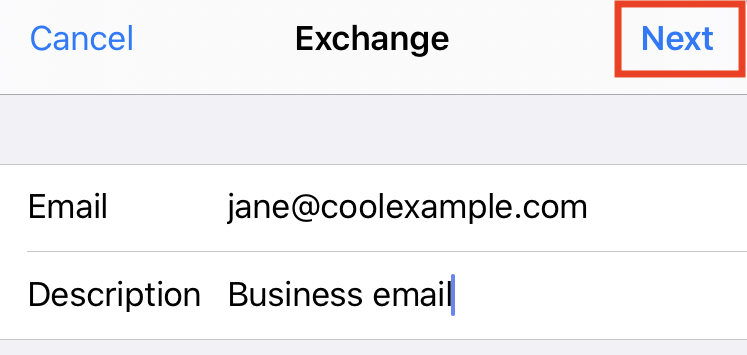
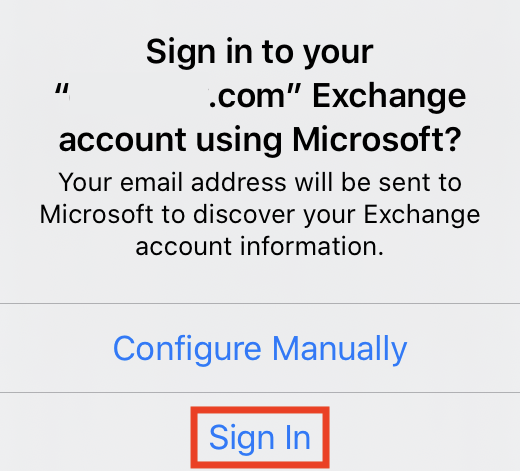
Add your Professional Email account to the Mail app on your iOS device. Then you can send and receive business emails from your iPhone or iPad.


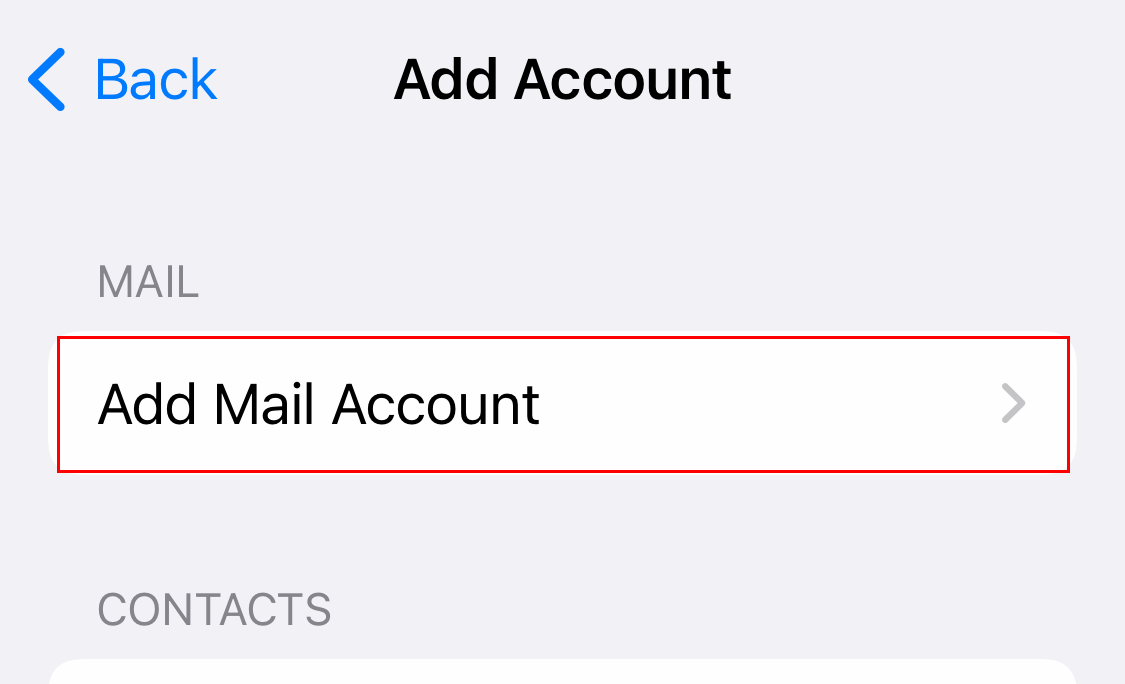
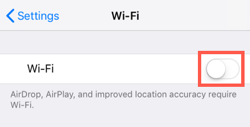
If the Mail app can’t discover your email account, tap Wi-Fi and turn off the toggle, then follow the steps again. When you’re done, turn your Wi-Fi back on.
End of section
If looking for additional help pertaining to Microsoft 365, webpages with secureserver in the web address are likely to be the best. Secureserver docs may refer to Microsoft 365 email as Business Email. Microsoft and secureserver have a unique partnership, so the secureserver info will be more applicable! Webpage addresses with microsoft may be directed to global users.
Most common problem: If having trouble receiving mail on your phone or activity is not synced between devices, you may be having trouble with the Exchange service or Exchange is not setup properly on your phone. Webmail does not need Exchange. Exchange is often required to process your email on mobile, so not only sends and receives your messages but makes sure it syncs with other devices where you use your email.
Here is a link you might try if you are having trouble sending emails or other problems on your phone. I would recommend accessing this page from a laptop or computer (Mac or Windows), plus you should first login to Microsoft 365 webmail before clicking the link below (login to your webmail: email.southeastacademy.net), so the system knows who’s account to deal with!
https://productivity.secureserver.net/app/updatetoexchange
After opening the productivity page above, click the blue “Update Settings” button. If a popup asks you to sign in and already have logged in to webmail, click Done.
End of section
I have found information on how to use Outlook with 3rd party clients such as Thunderbird, but I am not going to post instructions unless someone needs it. Here are general settings for IMAP and SMTP.
Info for 3rd party IMAP setup:
A) IMAP Incoming Mail Server: imap.secureserver.net:993
B) IMAP Password: Workspace email password
C) SMTP Outgoing Mail Server: smtpout.secureserver.net:465 (try port 587 as an alternative)
D) SMTP Password: Workspace email password
End of section
(Don’t use unless the instructions above did not work! Not for IOS Mail program!!!

Note: If Microsoft can’t find your account, you might be asked to enter your details manually. You may get a call to your phone to make sure it is you. (Unlikely)
• Email: Your Microsoft 365 email address
• Password: Your Microsoft 365 email password
• Server: outlook.office365.com (this is required)
• Domain: This can be left empty
• Username: Your Microsoft 365 email address
8. Tap Next. You might be asked to select Consent on behalf of your organization. This allows Microsoft 365 and the Mail app to work together. Tap Accept.
9. Tap Save. You can come back and update settings here at any point.

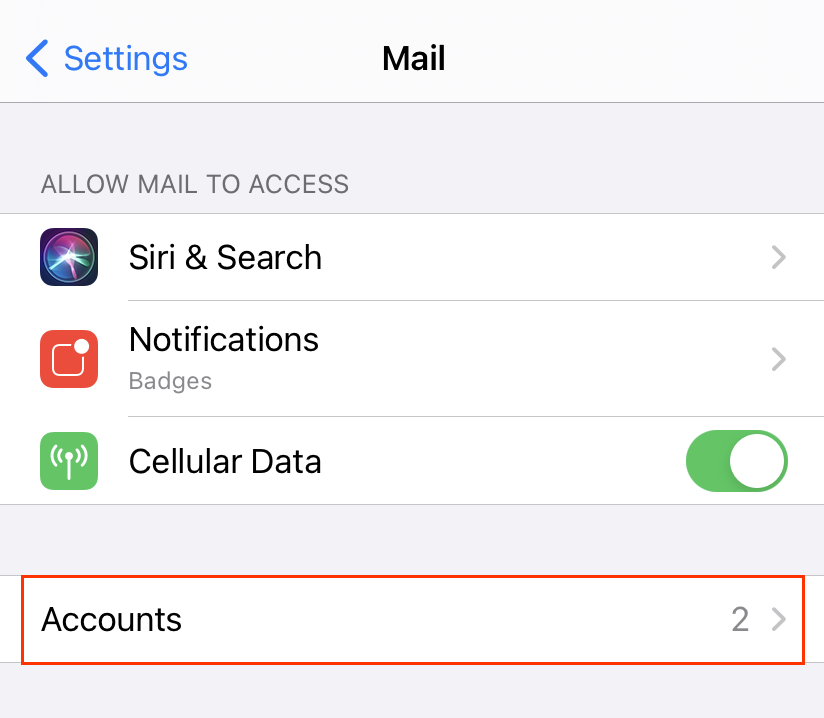
10. That’s it! You’ll see your Microsoft 365 account under Accounts.
iPhone or iPad users: Although I don’t recommend it for student privacy, you can add your Outlook account to the IOS Mail app. Microsoft Webpage for setting up an Outlook account on the iOS Mail app